3ds Max Advanced Exterior Visualizations
Advanced online video course for mastering exterior & interior visualizations in 3ds Max & Corona (+ bonus V-Ray lessons).
Do you feel the same?
A strong willingness for massive improvement
Do you have an undying passion to be the best version of yourself? To push your limits and create visuals that draw admiration from your peers? Of course, you do! That undying drive is a sign of your inner drive, determination, and aspiration. With these qualities, you can reach any level of success you desire. So, let your ambition soar and create stunning, hyper-realistic visuals that will be admired by your peers! With the right motivation, anything is possible!
Spread your wings
Are you willing to spread your wings and continue to develop your progress?
Create artwork
Do you want to make your visualizations something more than just images?
Master your images
Do you aspire to become a master in creating stunning exterior visualizations?
Aim to be the best
Do you want to beat your competition and be in a group of the top artists in the world?
Get recognition
Do you want to be recognized for your expertise and build a strong reputation with your clients?
Select your clients
Do you want to reach the point when you choose your clients, not vice versa?
Take a big leap
Join our training
100 Video Lessons covering advanced exterior visualization workflows.
12 Bonus Lessons which will show you Render Engines
Free Bonus E-book which will teach you about art rules.
Final Exam after which you’ll get a certificate.
Lifetime Access. You can endlessly re-watch the course.
Assets worth 1,000€, including 3D models, and free points for online rendering.
Exclusive discounts for different sorts of 3D models in different online shops.
GrowFX Tutorials provided by Globe Plants.
599.00€
Buy NowAfter the purchase is made, you will instantly get access to the full training.
Login details will be sent to your email.
Want to purchase more than 1 seat for your team?
Contact us here.
Gain the skills to create visually captivating and advanced 3D visualizations of exteriors, showcasing various scenarios with artistic flair, as part of your professional development.
Meet the presenter
Agnieszka
The team of highly skilled 3D artists behind the courses has dedicated years to perfecting the art of creating animations in 3D software. These results are presented by Agnieszka Klich – co-founder of Arch Viz Artist and YouTuber. With years of experience and the Arch Viz Artist YouTube channel, she presents this comprehensive know-how training on the AVA workflow, tricks, and tips to create stunning and engaging 3D visualizations.

Practice does not make perfect
Only perfect practice makes perfect
Being a 3D artist gives you the chance to create a lifestyle as you wish. Whether you want a full-time job at a studio, become a freelancer, or launch your own business, the possibilities are endless. We’ll teach you the best practices to make sure you don’t waste time learning the wrong techniques. Explore the opportunity to create the lifestyle of your dreams. Let’s take the first step and make your dreams a reality!
8-steps system
Composition
The balance between essentials and minutiae in the image.
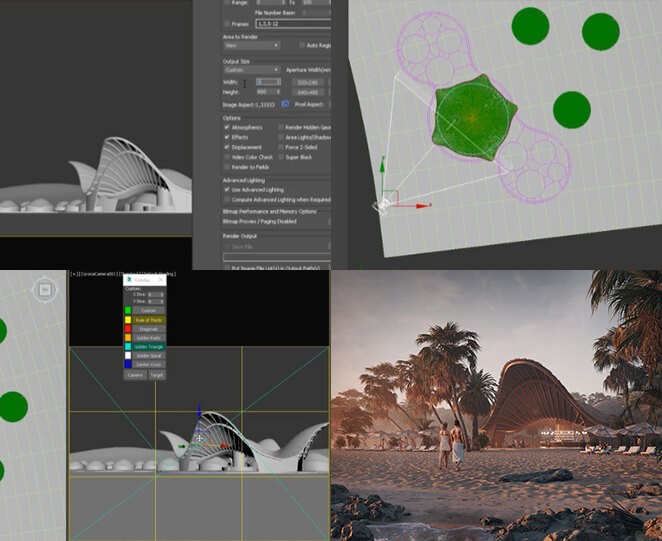
Camera setup
Setting up the camera angle that influences the viewer.
Lighting
Affecting emotions through the different lighting scenarios.
Color palette
Using the power of the colors in order to convey the message.
Materials
Creating high-quality and photo-realistic materials.
Assets Placement
Arranging assets to show the character of the place.
Storytelling
Creating additional value through the story.
Post-Production
Enhancing the image as a professional photographer.
We will present these visualizations
From start to finish

This system will work for you every time!
For who
Who should attend?

Experienced 3D artists
If you’re an experienced arch-viz artist but you feel like your exterior images could use a spark, then this course is for you! Learn how to take your visuals to the next level and create stunning images.
Intermediate 3D artists
This course is perfect for intermediate artists looking to refine their skills and take their exterior and interior visualizations to the next level. Learn to create captivating visuals and add the final touches to your work.
Interior Designer & Exterior Architect
Are you a skilled designer who has difficulty convincing others of your project ideas? This training can help you effectively communicate your concept through visualizations and get your point across.


Features
What will you learn?
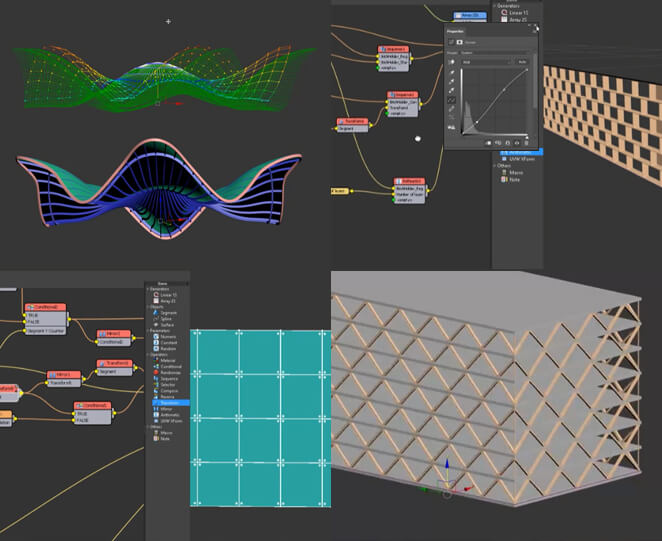
Modeling Techniques
In this course, you’ll gain valuable skills in creating parametric models using the RailClone plugin for 3ds Max. You’ll learn how to efficiently create models with parametric controls, making it a breeze to make modifications with just a few clicks, instead of spending hours on remodeling objects. This course will equip you with the tools and techniques to create professional-quality models that are not only visually appealing but also highly practical.

Camera Setup & Composition
Selecting the right camera angle is crucial to creating compelling visualizations. When creating advanced visualizations, the camera should be used to tell a story. It’s not just about coming up with the most creative angle, but also understanding how to use simplicity to achieve the desired effect. Knowing how to use composition rules to pick the right angle can help ensure the story you want to tell is properly conveyed. However, the camera should also be used to create something unexpected. Knowing the composition rules and how to apply them can help you capture the perfect shot.
Advanced Lighting Setup
Bringing alive emotions through the power of light is what this course is all about. In this course, we will explore advanced lighting scenarios to create stunning visualizations that will draw the attention of viewers. You’ll learn how to use lighting to capture emotions, alter moods and add depth to your images. Unlock the power of light and take your visuals to a whole new level.
Fog & Volumetrics
With the use of Fog & Volumetrics, you can create realistic and captivating visuals. This effect adds layers and depth to your work, transforming it and adding a unique atmosphere. From stirring the emotions of your viewers to enhancing the realism of your visuals, Fog & Volumetrics can help you take your visuals to the next level. Try it out and see the difference it makes.
Super Advanced Materials
Through this course you’ll learn how to create even the most complicated of materials, so you’ll never again be stumped when trying to bring your ideas to life. Master the details of real-life materials and understand how to recreate them to get the best results. By the end, you’ll have the skills to create any material with confidence.
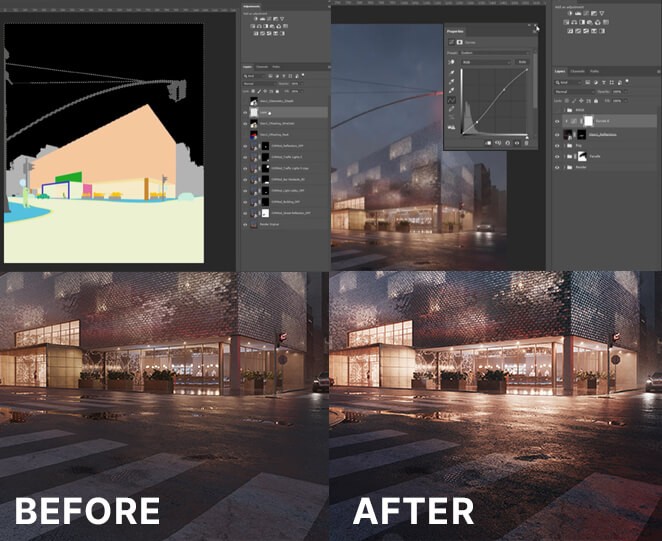
Post-Production
A post-production is a powerful tool for perfecting your visuals. It helps to bring out the most captivating elements of your image, add atmosphere and mood, and balance colors and tones, and overall harmony. Through our lessons, you will learn how to use post-production techniques to enhance your images and take them to the next level.
Learn this
in just
few weeks
or spend years trying to learn it by yourself
CURRICULUM
The training program
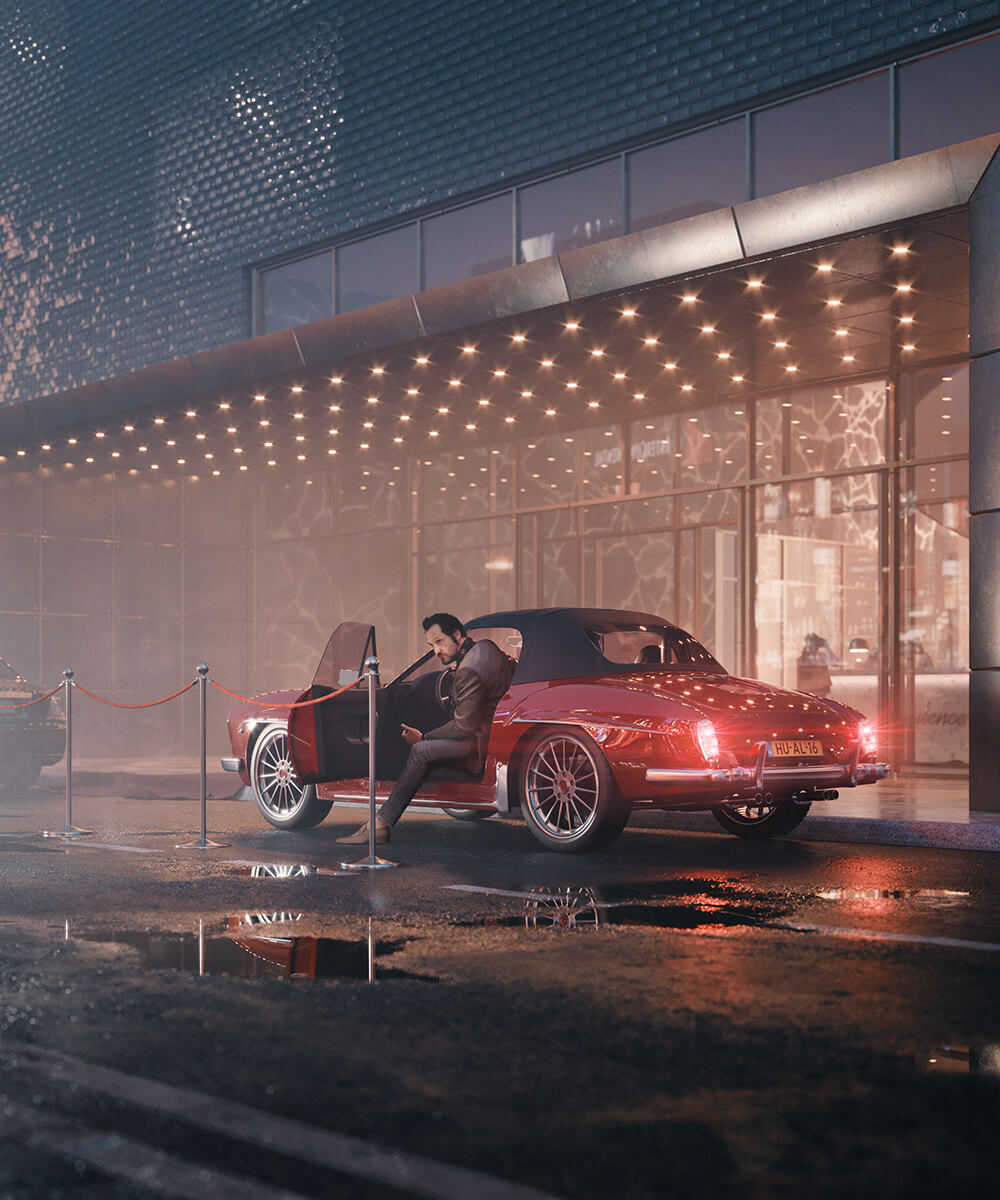
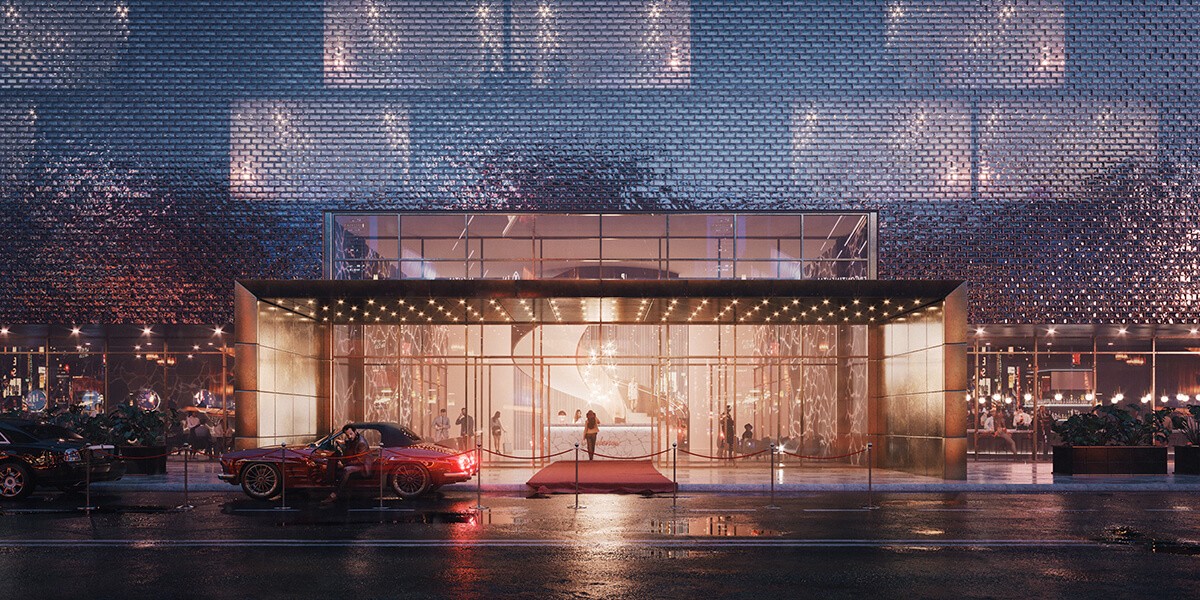
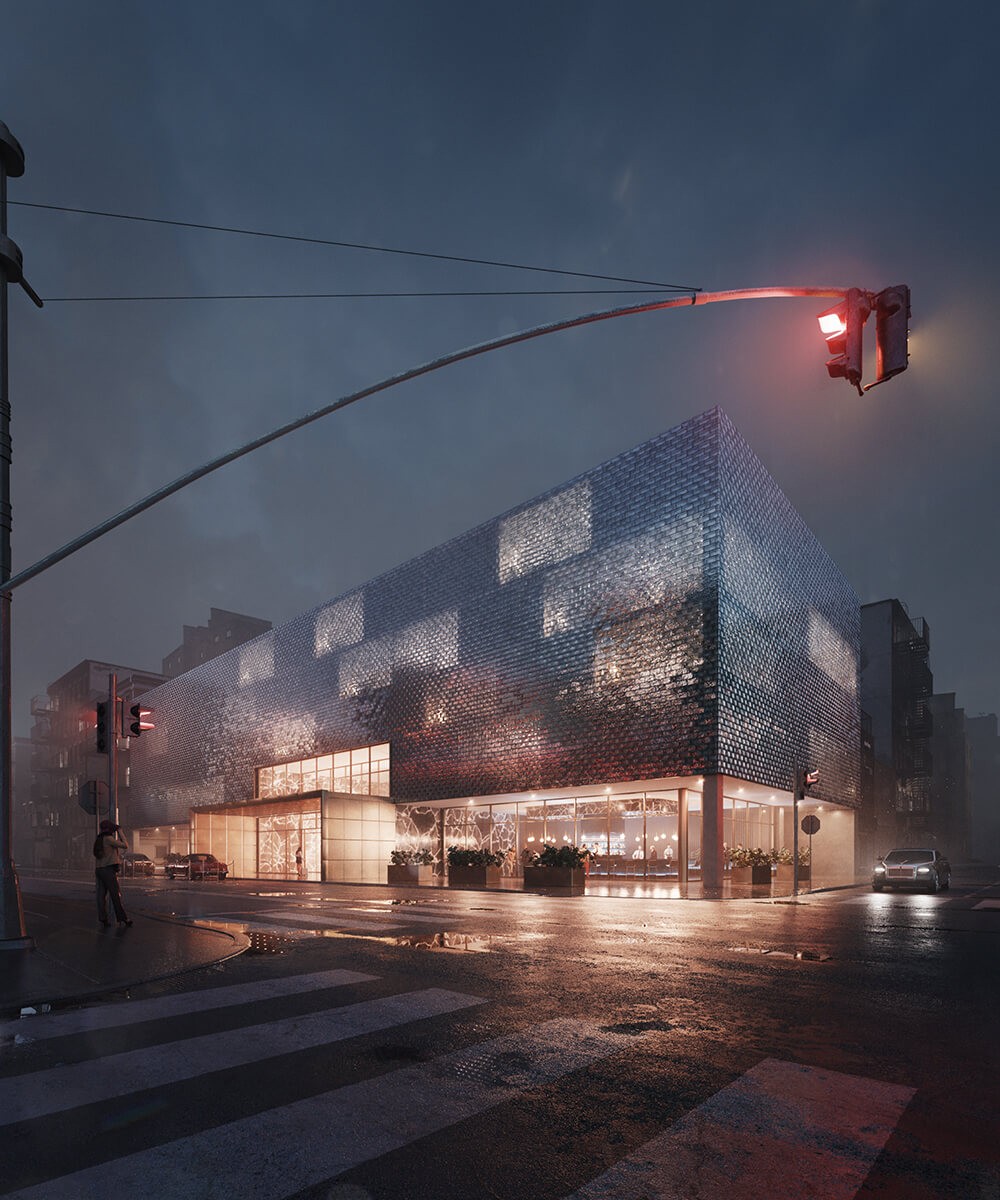
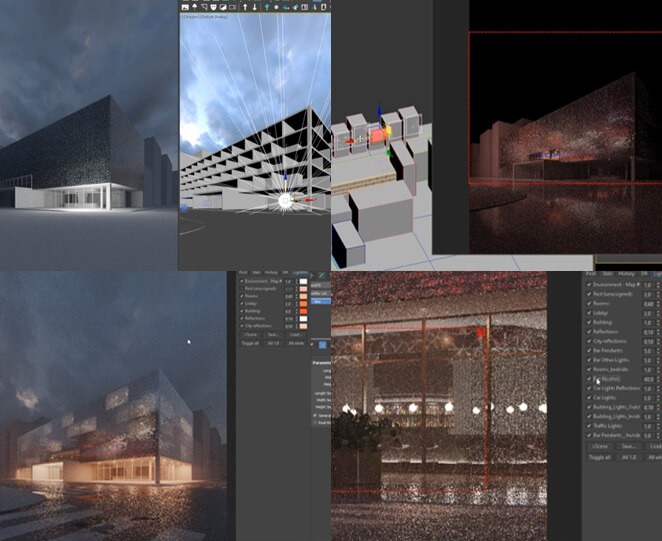
Advanced Exterior: Rainy Street Scene
- Overview & Scene Preparation
- Lesson 1 – Scene Overview 00:04:37
- Lesson 2 – Storytelling 00:03:31
- Lesson 3 – Colors’ Analysis 00:03:31
- Lesson 4 – Building Modeling 00:15:18
- Lesson 5 – Glass Facade Modeling – RailClone 00:27:19
- Lesson 6 – Glass Facade Material 00:19:57
- Lesson 7 – Camera Setup 00:08:16
- Image Creation
- Lesson 8 – Overall Lighting Setup 00:35:32
- Lesson 9 – Fog Setup 00:04:46
- Lesson 10 – Wet Asphalt Material – Part 1 00:08:13
- Lesson 11 – Wet Asphalt Material – Part 2 00:09:50
- Lesson 12 – Wet Asphalt Material – Part 3 00:12:03
- Lesson 13 – Additional Lighting Setup 00:09:00
- Lesson 14 – Building Materials 00:18:58
- Lesson 15 – Bar Lighting & Materials 00:19:01
- Adding Details
- Lesson 16 – Alcohol Placement – RailClone 00:23:19
- Lesson 17 – Rooms’ Assets Placing 00:06:16
- Lesson 18 – Lobby Lighting & Materials 00:16:56
- Lesson 19 – Exterior Assets Placing 00:43:22
- Lesson 20 – Final Changes 00:11:56
- Lesson 21 – 3D People Placement 00:14:19
- Finalizing scene
- Lesson 22 – Render Elements and Settings 00:08:11
- Lesson 23 – Post-production – View 1 00:23:41
- Lesson 24 – Post-production – View 2 00:14:59
- Lesson 25 – Post-production – View 3 00:11:59
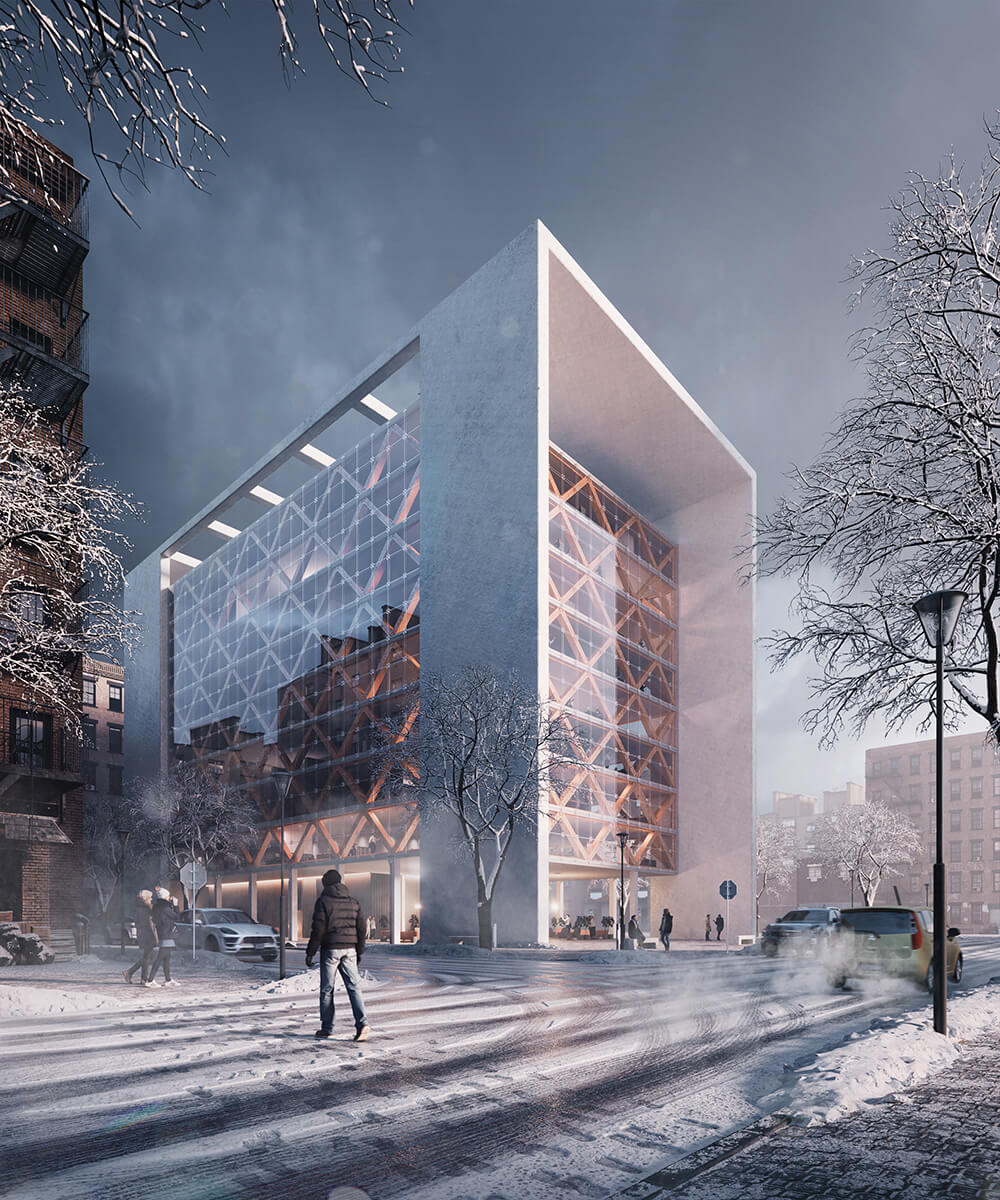
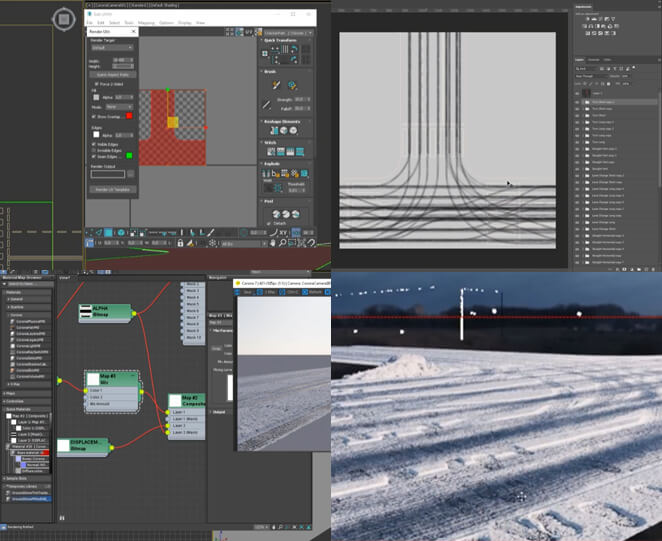
Advanced Exterior: Snowy Street Scene
- Overview & Scene Preparation
- Lesson 1 – Scene Overview 00:02:46
- Lesson 2 – Storytelling 00:02:00
- Lesson 3 – Colors’ Analysis 00:02:16
- Lesson 4 – Building Modeling – RailClone 00:13:38
- Lesson 5 – Glass Facade Modeling – RailClone 00:20:42
- Lesson 6 – Camera Setup 00:03:08
- Image Creation
- Lesson 7 – Lighting Setup 00:06:32
- Lesson 8 – Fog Setup 00:05:09
- Lesson 9 – Trees Placement 00:09:13
- Lesson 10 – Snow Material 00:10:00
- Lesson 11 – Building Materials 00:09:32
- Lesson 12 – Snowy Street Material – Part 1 00:09:17
- Lesson 13 – Snowy Street Material – Part 2 00:08:51
- Lesson 14 – Snowy Street Material – Part 3 00:15:42
- Lesson 15 – Snowy Street Material – Part 4 00:09:33
- Lesson 16 – Sidewalk Material 00:14:15
- Lesson 17 – Snow Assets Placement 00:11:05
- Lesson 18 – Creating Snow – Forest Pack 00:07:08
- Adding Details
- Lesson 19 – Lobby Asset Placement 00:27:19
- Lesson 20 – Interior Assets Placement – Forest Pack 00:09:38
- Lesson 21 – Exterior Assets Placement 00:10:16
- Lesson 22 – Cars Motion Blur 00:05:04
- Lesson 23 – 3D People Placement 00:12:00
- Finalizing scene
- Lesson 24 – Render Elements and Settings 00:03:43
- Lesson 25 – Post-production 00:12:40
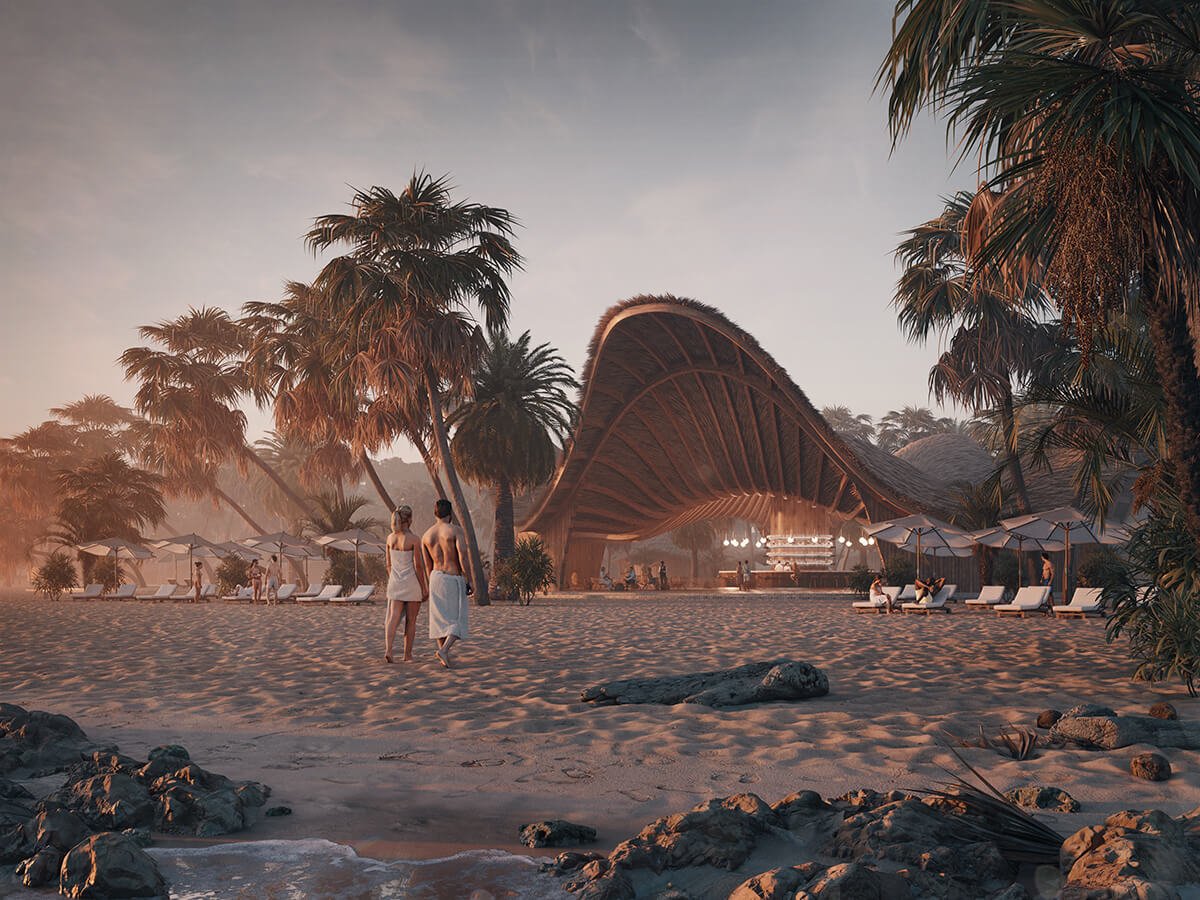
Advanced Exterior: Hotel on the Beach
- Overview & Scene Preparation
- Lesson 1 – Scene Overview 00:02:49
- Lesson 2 – Storytelling 00:02:05
- Lesson 3 – Colors’ Analysis 00:01:54
- Lesson 4 – Building Modeling 00:07:59
- Lesson 5 – Camera Setup 00:03:15
- Image Creation
- Lesson 6 – Lighting Setup 00:03:08
- Lesson 7 – Building Materials 00:08:56
- Lesson 8 – Creating Roofs – Forest Pack 00:07:31
- Lesson 9 – Palm Trees Editing – GrowFX 00:09:39
- Lesson 10 – Trees Placement – Forest Pack 00:04:56
- Lesson 11 – Trees Manual Placement – Forest Pack 00:07:45
- Lesson 12 – Fog 00:03:59
- Lesson 13 – Sand Material – Part 1 00:11:41
- Lesson 14 – Sand Material – Part 2 00:08:32
- Lesson 15 – Sand Material – Part 3 00:05:21
- Lesson 16 – Sand Material – Part 4 00:06:06
- Adding Details
- Lesson 17 – Beach Assets Placement – Megascans 00:04:13
- Lesson 18 – Adjusting Sand Material 00:10:16
- Lesson 19 – Adjusting Beach Assets Materials 00:10:34
- Lesson 20 – Interior Assets Placement 00:13:38
- Lesson 21 – Exterior Assets Placement 00:04:15
- Lesson 22 – Small Trees & Plants Manual Placement 00:10:16
- Lesson 23 – 3D People Placement 00:15:50
- Finalizing scene
- Lesson 24 – Render Elements and Settings 00:01:39
- Lesson 25 – Post-production 00:08:59
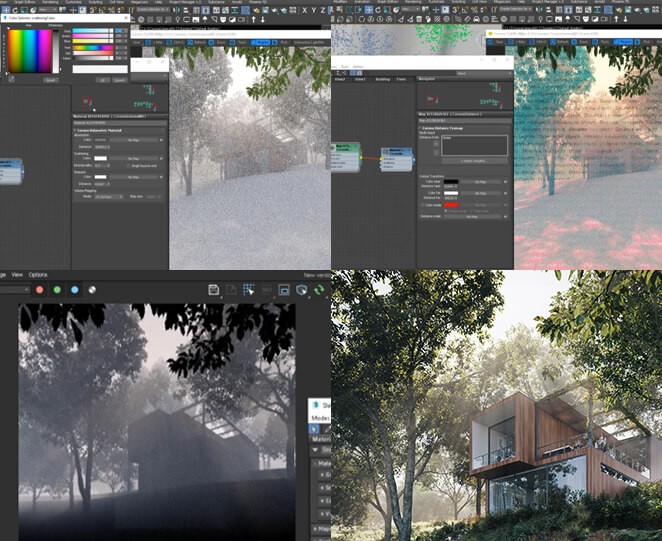
Advanced Exterior: House in the Forest
- Overview & Scene Preparation
- Lesson 1 – Scene Overview 00:02:14
- Lesson 2 – Storytelling 00:01:49
- Lesson 3 – Colors’ Analysis 00:01:32
- Lesson 4 – Wooden Cladding – RailClone 00:06:07
- Lesson 5 – Camera Setup 00:02:45
- Image Creation
- Lesson 6 – Trees Manual Placement 00:09:57
- Lesson 7 – Background Trees Placement 00:02:25
- Lesson 8 – Lighting & Fog Setup 00:11:39
- Lesson 9 – Tree Materials Editing 00:03:20
- Lesson 10 – Building Materials 00:08:56
- Lesson 11 – Ground Sculpting 00:05:25
- Lesson 12 – Ground Model Unwrapping 00:03:17
- Lesson 13 – Ground Material – Part 1 00:07:45
- Lesson 14 – Ground Material – Part 2 00:11:43
- Lesson 15 – Ground Material – Part 3 00:16:24
- Lesson 16 – Water Material 00:04:24
- Lesson 17 – Small Plants Placement – Forest Pack 00:10:18
- Lesson 18 – Larger Plants Placement – Forest Pack 00:04:03
- Adding Details
- Lesson 19 – Debris Placement – Forest Pack 00:10:27
- Lesson 20 – Assets Placement – Megascans 00:07:19
- Lesson 21 – Small Plants Manual Placement 00:07:13
- Lesson 22 – House Assets Placement 00:03:42
- Lesson 23 – Ivy Model Editing – GrowFX 00:07:13
- Finalizing scene
- Lesson 24 – Render Elements and Settings 00:01:48
- Lesson 25 – Post-production 00:08:07
Bonus lessons
- Render Engines
- Lesson 1 – Introduction to the training 00:02:54
- Lesson 2 – Corona Render Settings 00:28:11
- Lesson 3 – V-Ray Render Settings 00:04:11
- Lesson 4 – Corona VFB Window 00:09:51
- Lesson 5 – V-Ray VFB Window 00:18:54
- Lesson 6 – Corona / V-Ray Render Elements 00:09:24
- Lesson 7 – Corona / V-Ray Proxy 00:05:58
- Lesson 8 – Corona / V-Ray Cameras 00:08:54
- Lesson 9 – Corona / V-Ray Lighting 00:08:37
- Lesson 10 – Corona / V-Ray Lightmix 00:09:03
- Lesson 11 – Corona / V-Ray Materials 00:05:25
- Lesson 12 – Corona / V-Ray Fog & Volumetrics 00:22:33
- Lesson 13 – Homeworks & Certification rules 00:02:34


What do our students say?
Trusted by 2,000+ artists
from all over the world
Numbers
There’s a lot of it
…more than you think.
4
Exterior scenes that include different scenarios from bustling urban spaces to tranquil nature visuals.
100
Video Lessons that will teach you advanced visualization workflows used to create amazing exterior visualizations.
19
Bonus Lessons that will explain the differences in the production process workflow using Corona & V-Ray.
100 +
Lifetime access! Your access will never expire because you might forget something along the way.
Be prepared for everything
Every detail is done in 3D

Bonuses
Assets worth 1,000€
Models from Evermotion
16 Evermotion models including street elements, surrounding buildings, interior props and plants, and garden furniture.
VALUE: 252€

Trees & Plants form Globe Plants
8 Globe Plants models of different kinds of greenery i.e. trees and plants including grasses, a creeper, and palms.
VALUE: 150€
3D People from Renderpeople
3 posed Renderpeople models including a gentleman and lady for beach shots and a mother with a child.
VALUE: 150€
Trees & Plants form Maxtree
2 whole packs of different kinds of greenery from Maxtree including forest trees and plants (144 models in total).
VALUE: 300€
3D People from Humano
5 Humano 3D people models including a waiter, a man drinking from a cup, casual lady and couple, and an older elegant lady.
VALUE: 108€
Render Points from RebusFarm
25 Rebus Points for online rendering on the RebusFarm, a great solution if you struggle with low RAM or want to render fast.
VALUE: 25€


English is not your first language? Not a problem!
We have subtitles in selected languages:
English
(Audio + Subtitles)
Spanish
(Subtitles)
Arabic
(Subtitles)
Bengali
(Subtitles)
Chinese
(Subtitles)
French
(Subtitles)
German
(Subtitles)
Hindi
(Subtitles)
Hungarian
(Subtitles)
Indonesian
(Subtitles)
Italian
(Subtitles)
Japanese
(Subtitles)
Korean
(Subtitles)
Polish
(Subtitles)
Portuguese
(Subtitles)
Russian
(Subtitles)
Turkish
(Subtitles)
Want to learn even more?
Check out our
bestseller bundles!
With Animation & Advanced Interiors Training
3-pack bundle
1,797.00€ 1,497.00€ Save 300€
Buy this bundleWith Basic Visualizations & Animation Training
3-pack bundle
1,697.00€ 1,397.00€ Save 300€
Buy this bundle
FAQ
See if you can discover the answer
here to your question!
-
The software we use during the course: 3ds max version 2022 Corona Renderer version 7(the whole course is in Corona but we will include the bonus module where we will explain the main differences between the Corona Renderer version 7 and V-Ray Renderer 5).Adobe PhotoshopPlugins: Forest Pack Rail Clone GrowFXThis is a principle-based course, versions of the software don’t matter at all. You will be able to follow the training using any version of the above software.Files are saved down to the 3ds max 2019 version. If you have an older 3ds max, you can download a trial and save it down on your own.
-
You will get lifetime access so you can learn at your own pace without any worries.
If we ever remove it from the platform in the future, you will receive ample notice and have the opportunity to download all videos and files in advance. -
Yes! The initial and final scenes will be available to download including cameras, lighting, post-production in renderers, and some basic models created by us.Please note that commercial textures and assets EXCEPT those presented in the bonuses section are NOT included due to licensing.Materials will be included but the textures will be missing. Once you get the textures, you will have full materials. We will provide links to all the textures we have used.
-
Most of the assets are included!*Please note that assets from Maxtree can be used ONLY for learning purposes, not for commercial use.Materials will be included but the textures will be missing. Once you get the textures, you will have full materials. We will provide links to all the textures we have used.
-
A refund will not be possible, in accordance with Consumer Rights (art. 38, point 13).
-
You will get lifetime access so you can learn at your own pace without any worries.
We did all the heavy lifting for you
Just watch the tutorials & practice
Don’t worry about anything else, the results will come naturally.
Buy Now